Rebranding Checklist for CPG Brands: From Strategy to the Shelf
A rebrand for a consumer packaged goods brand comes down to nine stages, after one decision up front: whether you need a refresh or a full rebrand. Then audit what customers already recognize, set the budget and the team, define the positioning, write the brief, design the identity and the packaging system, test it before you print, prepare production, roll it out across every SKU, retailer, and channel in a planned order, and measure the result. The checklist below walks through each stage, with the questions to answer before you move on.
When a rebrand loses sales, the new logo is rarely the reason. More often the brand dropped the cues loyal buyers use to find the product, told retailers late, threw away old packaging that could have been used up, or missed places where the old brand still lives.
We wrote this from the packaging side. For a CPG brand, the package does the selling, because that’s where shoppers decide, and most of them will meet your new identity on a shelf or an Amazon listing long before they see your website. At SOTDESIGN we design packaging systems and redesigns for US consumer brands, and the items below are the ones we’ve seen decide whether a rebrand lands.
The rebranding checklist at a glance
| Stage | What you decide | Who owns it |
|---|---|---|
| 0. Scope | Refresh or full rebrand, and why | Founder |
| 1. Audit | What customers recognize and what has to stay | Founder or marketing lead |
| 2. Budget and team | Total budget, target date, one decision-maker | Founder |
| 3. Positioning | Who it’s for, price tier, front-of-pack message | Marketing lead |
| 4. Brief | Everything the designer needs, including what to keep | Marketing lead |
| 5. Design | Identity and the packaging system for every SKU | Design partner |
| 6. Testing | Can loyal buyers still find you? Do new ones get it? | Marketing and sales |
| 7. Production | Dielines, proofs, barcodes, old inventory | Operations |
| 8. Rollout | Retailers, Amazon, website, every other touchpoint | Sales and marketing |
| 9. Measurement | Sales by SKU and channel before and after | Founder |
Rebrand or refresh: decide how far to go
Start by naming the problem the rebrand is supposed to solve. In CPG it’s usually one of these:
- The packaging looks dated next to newer competitors, and sales are flat or slipping.
- The range grew without a system. Each new SKU was designed on its own, and the line no longer looks like one brand.
- You’re moving up or into a new channel, for example from farmers’ markets and DTC into grocery, or from regional to national retail.
- Positioning changed, with a new price point, a new audience, or a reformulated product.
- A merger or new ownership means you need a single identity.
Once you know the problem, decide how deep to go:
- A refresh keeps the name and the core identity, cleans up the logo, tightens the color system and typography, and rebuilds the packaging layout. It suits most brands whose identity still works but whose packaging doesn’t.
- A full rebrand changes the positioning and often the name, the logo, and the visual language. It makes sense when the old brand actively works against you.
Most CPG brands that think they need a full rebrand would do better with a strong refresh. It costs less and takes less time, and you keep the recognition you’ve already paid for.
Stage 1: Audit what you already have
Checklist:
- List every SKU, size, and pack format in the current range.
- Photograph your products on the shelf next to competitors, in real stores, and capture your Amazon search results page.
- List every place the brand appears: packaging, labels, shipping cases, display trays, sell sheets, website, Amazon listings, social profiles, email templates, trade show materials, vehicle wraps.
- Gather sales data by SKU and channel, so you know which products carry the business.
- Ask customers and retail staff what they look for when they find your product.
What you most need from this stage is a list of your distinctive assets, meaning the colors, shapes, symbols, or words buyers use to recognize you. It might be a specific orange, the shape of a jar, a character, or the way the name is set. Shoppers rarely read packaging closely. They scan for familiar cues, and if you remove those cues without warning, loyal customers walk right past you.
Tropicana’s 2009 carton redesign is the case everyone cites. It replaced the familiar orange-with-a-straw image with a plain glass of juice. Sales reportedly fell about 20% in the first two months, many shoppers complained the new carton looked like a store brand, and less than two months after launch the company announced it would bring the old design back.
Go through each distinctive asset and decide whether to keep it as is, evolve it, or retire it. Write the decision down, because it turns into a rule in the design brief.
Stage 2: Set the budget, timeline, and team
Checklist:
- Budget for design: identity, packaging system, and every SKU adaptation.
- Budget for production: new plates for every SKU if you print flexo or offset (digital printing has no plates), new dies only if the structure changes, proofs, and the cost of writing off or using up old packaging.
- Budget for the rollout: new product photography, Amazon images, website updates, sell sheets, and trade materials.
- Set a target date and work backward from your printer’s lead times and your retailers’ calendars.
- Name one decision-maker for the design.
Design is often the smaller part of a rebrand budget. Printing plates for every SKU, new photography, and updating every listing add up fast. On our side, packaging design starts at $2,500 for the system and the first SKU, each additional SKU is about $800, and a logo is about $1,500, so a logo plus a four-SKU line comes to about $6,400 ($1,500 + $2,500 + 3 × $800). If your scope looks different, our guide to how much packaging design costs covers typical ranges by scope and SKU count.
Keep the team small. The founder or marketing lead owns the project, and around them you want someone from operations who knows the printer and the inventory, someone from sales who talks to retail buyers, and your design partner. Investors, family members, and the rest of the company are welcome to see the work. Only one person makes the call.
Stage 3: Define the positioning before the visuals
Checklist:
- Write one sentence on who the product is for and why they should choose it over the brand next to it.
- Define the price tier you want to signal: value, mainstream, premium, or super-premium.
- Map the competitive shelf: where the category conventions are, and where you can stand apart.
- Decide the message hierarchy for the front of pack: one main message, two or three supporting points.
- Check claims you want to add and whether you can back them. An “organic” claim on the front of the pack generally requires USDA organic certification, “high protein” is an FDA-defined claim (at least 20% of the Daily Value per serving), and adding or removing a certification seal can also mean a new UPC (see Stage 7).
Without a clear position, visual decisions are easy to argue about and hard to settle. “Premium but approachable” is not a position. “The protein snack that tastes like a dessert, priced a dollar above the leading bar” is. Once the team agrees on a sentence like that, you can hold every concept up against it.
This is also the time to talk to your retail buyers, while what they say can still change the design. Ask what they’d want to see changed. Buyers see every brand in the category, and they often know exactly why your product isn’t moving.
If the name changes, add these:
- Run a trademark search before you fall in love with a name. Start with the USPTO’s trademark database, then have a trademark attorney clear the shortlist.
- Check that the domain and the main social handles are available.
- If you sell on Amazon, plan for Brand Registry. Amazon requires an active registered trademark, or a pending application filed through its IP Accelerator program, and the brand name on your products or packaging has to match it. A new name means a new trademark application and a new enrollment, so check Amazon’s current requirements before the new name goes on the pack.
- Leave time for the legal side. The USPTO put average total processing time for trademark applications at about 10 months in the first half of fiscal 2026, and you don’t want to print 20,000 pouches with a name you can’t protect.
- If your company registers a food facility with FDA and its company or trade names change, update the registration. FDA rules require updates within 60 days of a change.
- Change the “Manufactured for” or “Distributed by” line on every label if the company name changes.
- If the domain changes, redirect every old URL to its new page and update your Google Business Profile.
- Ask your attorney or accountant what the change means for your legal entity, DBA filings, bank accounts, insurance, and contracts.
Stage 4: Write the brief
Checklist:
- Summarize the audit: what isn’t working and what must not change.
- List the distinctive assets to keep and the ones you’re ready to evolve.
- Include the full SKU list, pack formats, and dielines from your printer.
- Attach shelf photos, competitor packs, and the regulatory copy for each SKU.
- State the deliverables, timeline, budget, and approval process.
A rebrand brief looks like a regular packaging brief with one added section that spells out what you’re keeping and why. The rest follows the usual structure, which we go through section by section, with a copy-and-paste template, in our guide on how to write a packaging design brief.
planning a packaging redesign?
send us your current packs and what has to change: fixed estimate in 1–2 business days
get quoteStage 5: Design the identity and the packaging system
Checklist:
- Start with the logo and the core identity, if they’re changing: wordmark, colors, typography.
- Design the packaging system on your best seller first, then test it on the hardest SKU: the one with the longest name, the most copy, or the smallest pack.
- Build a clear way to tell variants apart: color, illustration, iconography, or a combination.
- Check the front of pack at shelf distance and as a small thumbnail.
- Lay out the full back panel with the real regulatory copy.
- Get a short brand and packaging guidelines document, so the next SKU, your co-packer, and your sales team stay consistent.
For a CPG brand, most of what people see of a rebrand is the packaging system. That system is a set of rules about where the logo sits, how the flavor or variant is called out, what the color does, where the claims go, and how the back panel is organized. When the rules are good, the 12th SKU is easy to add. When they’re weak, the hero product looks great and the rest of the line falls apart.
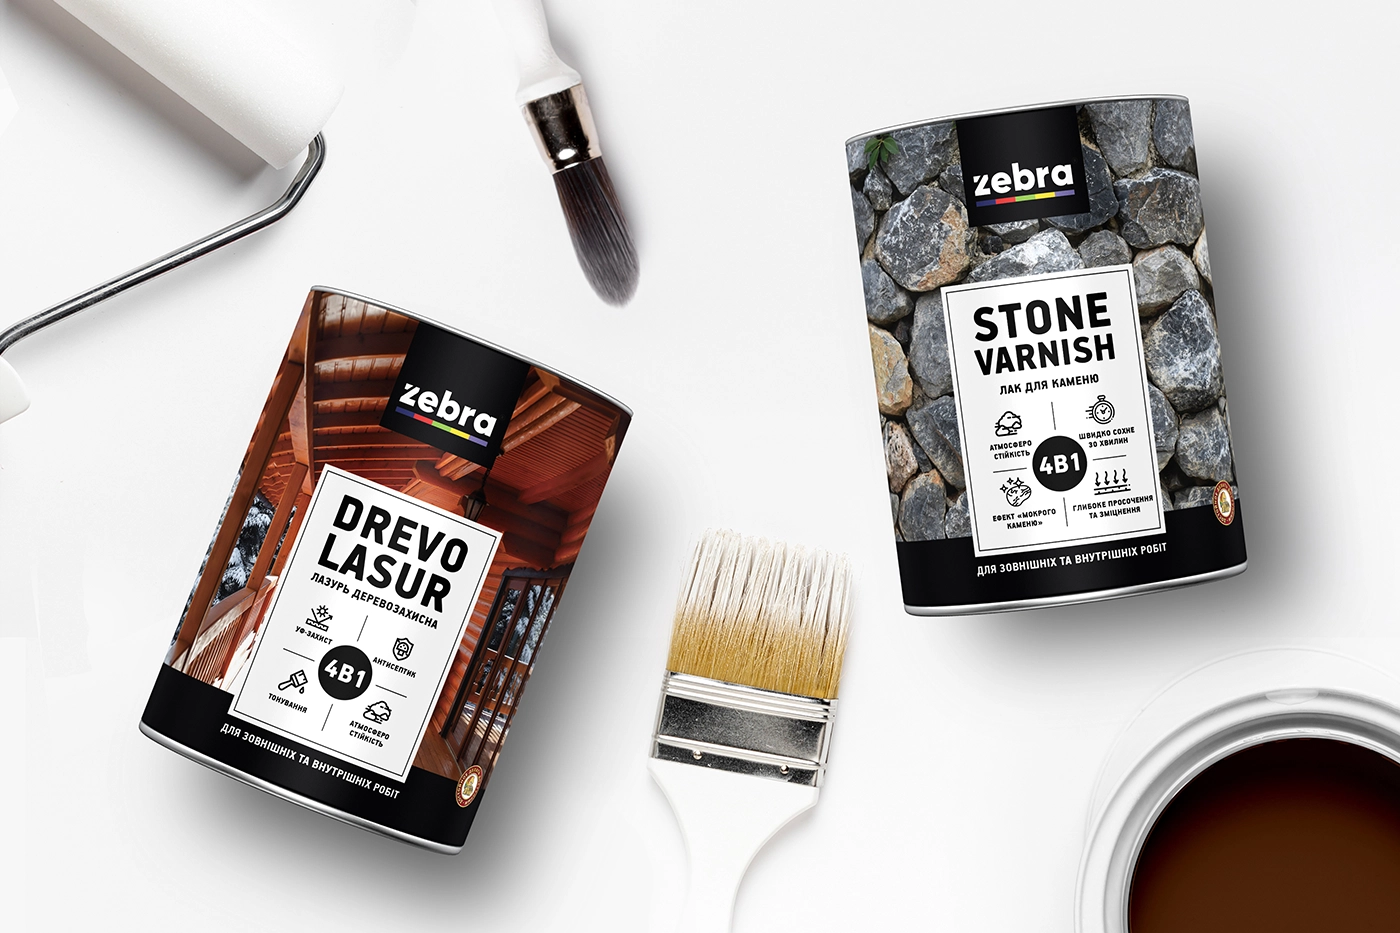
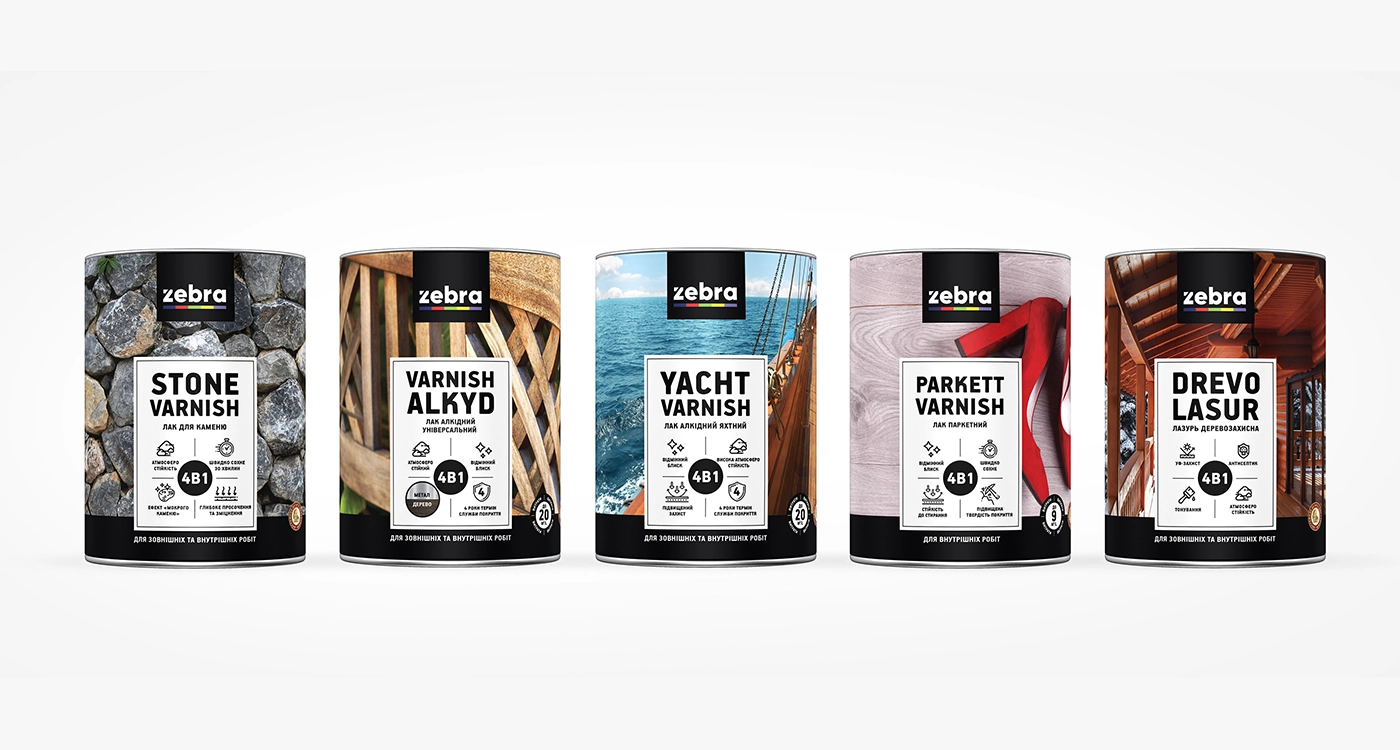
Two of our own redesigns follow this pattern. For the ZEBRA varnish line, the old packaging no longer looked modern or competitive, didn’t work well across SKUs, and didn’t clearly show the benefits or where the product comes from. We kept the ZEBRA logo but improved it with higher contrast and better placement, so it now anchors every pack in the range. The whole range moved to a single package system with bold sans-serif type, an icon-based layout, and a black-and-white label layout. Each product got its own material image, such as stone, wood, a boat, or parquet, so buyers can see what it’s for, and every version carries the same 4-in-1 advantages block covering gloss, durability, and drying time.
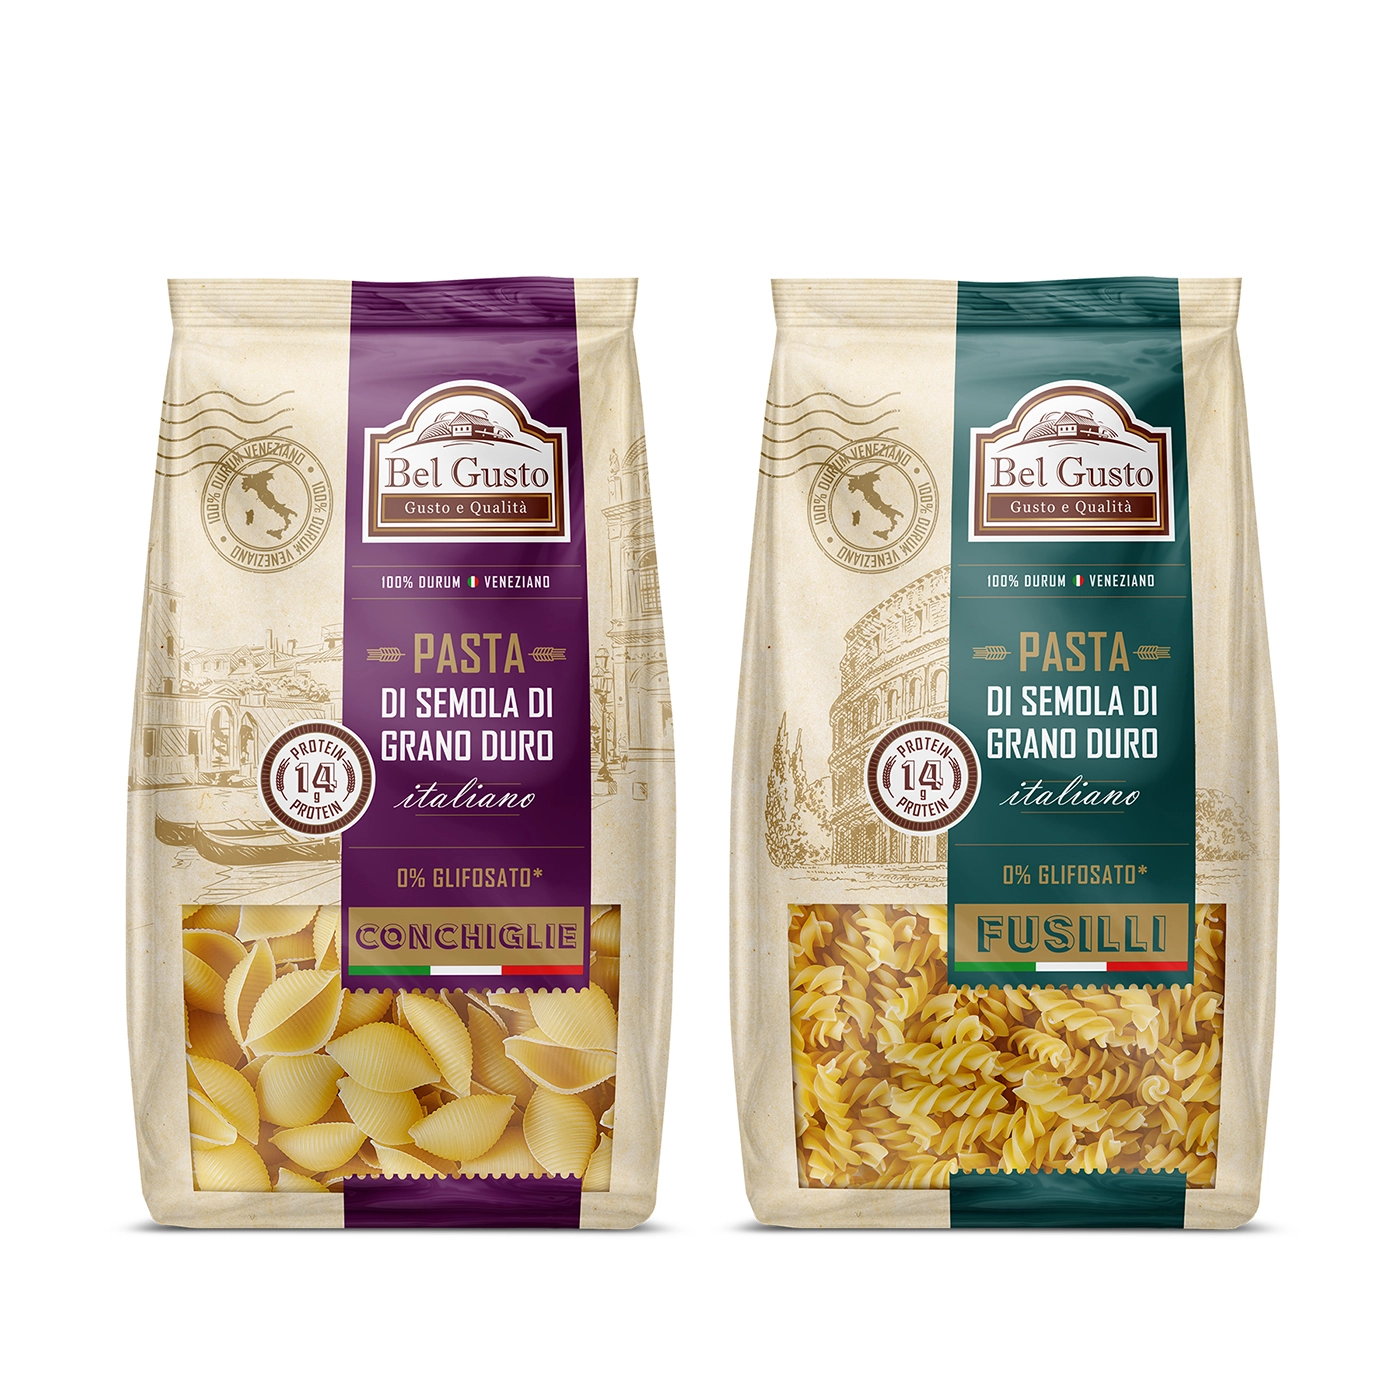
For Bel Gusto pasta, we redesigned the whole package around the idea of a postal parcel from Italy, with postage stamps, hand-drawn images of Italy’s historic sites, and a kraft paper texture. A transparent window lets shoppers see the pasta itself, which gives them confidence in its quality.
Stage 6: Test before you print
Checklist:
- Print physical mockups on the real material and size, and put them on a shelf next to competitors.
- Show the old and new packs to existing customers. Can they still find you?
- Show the new packs to people who don’t know the brand. Do they understand what it is and who it’s for in a few seconds?
- Get feedback from one or two retail buyers.
- Have your regulatory advisor approve the final copy on every SKU.
You don’t need a research agency for this. A dozen conversations with real buyers and a mockup on a real shelf can catch the most common problems. Watch for two failures in particular: loyal customers who can’t find you, and new shoppers who can’t tell what the product is.
If the test shows customers losing you, keep the design and bring back or strengthen the distinctive asset they were looking for. That alone often fixes it. Retest before you print.
Stage 7: Prepare production
Checklist:
- Get current dielines from your printer for every format and confirm container dimensions are final.
- Request color proofs and approve them against the brand colors before the full run.
- Decide on barcodes. Under GS1’s GTIN rules, a change to artwork alone usually keeps the existing UPC. A new one is typically required when the primary brand name changes, when you add or remove a certification mark such as USDA Organic, when declared net contents change, when a pack dimension changes by more than 20%, or when the count per case changes. Check GS1’s GTIN Management rules for your case before files go to press.
- Plan the inventory switch: how much old packaging you have, and whether you’ll use it up or write it off.
- Update nutrition panels, ingredient lists, and claims if the formula changed with the rebrand.
Using up old packaging is cheaper, but you’ll have two looks on the shelf for a while. Writing it off gives you a clean launch and costs money. Many brands trim their last order of old packaging to the volume they’ll actually use before the new packs arrive, so there’s little or nothing left to throw away at the switch.
Stage 8: Roll it out everywhere
Checklist:
- Tell your retailers early. Many grocery buyers need months of notice for item changes and new planogram images. Ask each buyer for their timeline.
- Update item data with distributors and retailers: new images, descriptions, and case pack information.
- Replace Amazon images and A+ content when new stock arrives. If you use FBA, old and new packs will ship side by side until old stock sells through, so add an image showing both packs or a “new look, same product” note in the meantime.
- Update the website, product photos, and social profiles.
- Replace sell sheets, shipping cases, display trays, and trade show materials.
- Update email signatures, invoices, business cards, and any vehicle or booth graphics.
- Consider a “new look, same great product” flag on the first runs so loyal buyers aren’t confused.
- Tell your customers the story: why you changed, and what didn’t change.
Rollout is where most rebrands get messy. New packaging is in stores while the old one is still on Amazon, a distributor keeps sending the old images, and a sales broker is still handing out last year’s sell sheet. Take the touchpoint list from Stage 1, give every item an owner and a date, and check them off as they’re done.
A six-SKU snack brand in regional grocery might roll out like this. In month 1 you do the audit, budget, and positioning, and sales lets the main retail buyers know a new look is coming and asks for their timelines. Month 2 is the brief and design. Month 3 covers testing, buyer feedback on mockups, and final files. In month 4 the packs are printing while sales submits new images and item data. In month 5 the last old packaging ships, new packaging goes out, and Amazon and the website switch over the day new stock lands. Months 6 to 9 are for watching sales by SKU and fixing anything shoppers struggle with. Your printer and your retailers’ reset calendars may stretch or compress this, but the order rarely changes.
Stage 9: Measure the result
Checklist:
- Compare sales by SKU and channel for at least three to six months before and after.
- Watch Amazon conversion rate and search ranking on the new images.
- Ask retail buyers and store staff for feedback.
- Track new retail accounts and distribution wins.
- Note what customers say in reviews and on social media.
A short dip in some channels is normal while loyal buyers adjust. If the dip lasts more than a few months, or sales drop sharply right after launch, a distinctive asset probably got lost along the way. Bringing the missing cue back usually fixes it, but you’ll only spot the problem if you’re tracking sales by SKU.
Common rebranding mistakes
- Changing everything at once. A new name, logo, colors, and pack structure in one launch leave loyal buyers with nothing familiar to look for.
- Designing for the hero SKU only. The system has to work on every product, including the awkward ones.
- Skipping retailers. A buyer who first sees the new look when cases arrive has the wrong images in the planogram and may have the wrong item data, and the product can sit in receiving.
- Forgetting the long tail of touchpoints. Old shipping cases and sell sheets can keep the old brand around for years.
- Having no owner. Without one decision-maker, every concept gets averaged across opinions, and the revision rounds run out before anyone decides.
How we approach packaging redesigns
We start a redesign with your current line: what you sell, which cues buyers recognize, and what has to stay. The system is built on your best seller and then tried on the hardest SKU in the line before we roll it out to everything else, so the whole range holds together. Pricing for our packaging design services starts at $2,500 and covers three concepts and three rounds of revisions. Once we’ve reviewed your brief, you’ll have a fixed estimate within 1–2 business days, and most packaging projects take two to three weeks from kickoff to final files.
SOTDESIGN is based in Albany, New York. We’ve spent 10+ years on branding and packaging and have finished 80+ packaging projects for US consumer brands. We only design and don’t do any printing ourselves, so your files are built on your printer’s dielines, and they’ll work with whichever printer you use.
ready to refresh your packaging?
we redesign the whole line, not just the hero SKU: design only, any printer
get quoteFAQ
01 How long does a CPG rebrand take?
Designing the packaging usually takes two to three weeks from kickoff to final files. A full rebrand with new positioning, a new identity, testing, and retailer coordination usually takes three to nine months. Retailer calendars and printer lead times tend to set the pace more than design does.
02 How much does a rebrand cost?
Design is usually the smaller part. Our packaging design work starts at $2,500, which covers the system and the first SKU. Each SKU after that is about $800, and a logo is about $1,500. For a logo and a four-SKU line, that’s about $6,400 ($1,500 + $2,500 + 3 × $800). Printing plates, photography, and updating every channel come on top, and together they often cost more than the design. Our guide to packaging design costs covers typical ranges by scope.
03 What should a rebrand include?
At minimum, you need a clear reason and scope, an audit of what customers recognize, positioning, the logo and identity if they’re changing, a packaging system for every SKU, a short brand and packaging guidelines document, production files and proofs, and an updated version of every touchpoint. That last list is longer than most brands expect. It includes shipping cases, display trays, sell sheets, retailer item data, Amazon listings, the website, social profiles, email templates, and trade show materials.
04 What’s the difference between a rebrand and a brand refresh?
A refresh keeps the brand’s name and core identity and modernizes how it looks. A rebrand changes the positioning and often the name, logo, and visual language. Most CPG brands get more from a strong refresh than a full rebrand, because they keep the recognition they already have.
05 Should I change my packaging and logo at the same time?
Usually yes, if both need it, as long as you keep at least one cue loyal buyers recognize, such as the color or the shape. Shoppers meet a CPG brand on the package, so a new logo on old packaging rarely changes much. If the logo is still strong, refine it and spend the budget on the packaging system.
06 Do I need a new UPC barcode after a rebrand?
Usually not, if only the graphics change. GS1’s rules typically call for a new UPC when the brand name changes, when the declared net quantity or pack count changes, when a certification seal is added or removed, or when a formula change alters the required label information. The full list of rules is published by GS1.
07 How do I keep loyal customers from getting confused?
Keep at least one or two distinctive assets they recognize, such as a color, a shape, or a symbol. You might also put a “new look” flag on the first runs. Update online images the day new stock arrives, and tell customers what changed and what didn’t.
08 Should we announce the rebrand before it hits shelves?
Tell retailers and distributors well ahead, because they need time for item changes. For shoppers, a short heads-up on social media and your email list a few weeks before launch helps, especially with photos of the new packs so people know what to look for. Just don’t announce it so early that customers go looking for packaging that isn’t in stores yet.
09 When is the right time to rebrand?
When the brand is holding back growth: you’re entering a new channel or moving to a new price tier, the range has outgrown its design, or the packaging looks dated next to competitors and sales show it. Being tired of your own logo is rarely a good reason by itself, since you look at it every day and your customers don’t.